100 x Simple Cowl
[originally posted February 2014]
The last few winters in Michigan have surpassed themselves in bitterness and greyness. As we plunged into February, with little sun in sight, and temperatures reaching highs in the single-digits, I resolved to become better at knitting Continental style. Now, I can knit continental - I usually do stranded color knitting with both hands - my right flicking English style, my left picking Continental. But I never worked an entire project Continental. Why? Well, for the last several years I have been knitting for production - for the shop, as a needles-for-hire test/sample knitter, and it is not an easy thing to change your knitting style. And you certainly shouldn't do it in the middle of a project, much less one that you are being paid to knit! But with a bleak month ahead of me, I was determined to knit an entire project Continental.
So, I picked up my needles and within 3 inches of my provisional cast-on, I was beginning to get fast, my tension was reliable, and more than that I was having fun! Each night when I sat down to knit, I would place a locking stitch marker at the top of my knitting, and I would marvel at the inches I could knit before bedtime.
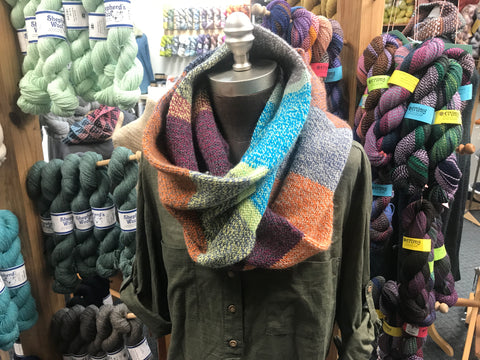
100 x Simple Cowl
meg croft for woven art
Dreamed up during the dreariness of winter, this four-skein cowl is bizarrely addictive and incredibly simple to knit. Pick out your colors, wind them into center pull balls, and choose the order you will knit them before you start. Make sure to try the Spit Splice join when adding new skeins! (instructions below) Try Continental Knitting if you don’t knit that way already.
Materials
-
4 skeins of Stonehedge Fiber Mill’s Crazy yarn, aka "millends". 230 yards/75 gram ball. 100% merino wool.
-
2 US 7 or US 8 circular needles, - 16 inches in circumference
-
1 stitch marker
-
darning needle
-
crochet hook
-
waste yarn, in a color very different from your starting color
Gauge: 21 stitches over 4 inches, unblocked, in stockinette stitch.
Gauge is not critical for this project, and you should find the resulting fabric soft, but substantial.
Directions
Using provisional cast on and waste yarn, cast on 100 stitches. (I prefer this method for casting-on provisionally.)
Join in the round, being careful not to twist, and place a marker to designate the beginning of your round. (This isn’t important until the very end, and it will aid you when it is time to kitchener your cowl into a continuous loop.)
Knit all rounds, slipping your beginning of the round marker when you come to it, and attaching new skeins as needed. (see the note below about the wonders of Spit Splicing!) Knit until you have about 4 yards left of yarn.
Carefully remove your waste yarn and place live stitches on the spare needle. Be sure to line up your beginning of the round marker with the join in your waste yarn. This will ensure your cowl doesn’t have a twist in it.
Kitchener Directions
Kitchener your cowl together by lining up the two circular needles so that the needle with the last knit section, and yarn attached, is the back needle (with purl side facing you), and the new needle with your first row knit is the front needle (with knit side facing you).
Step 1: Front Needle: insert darning needle into the first stitch knit-wise, pull stitch off the needle and pull yarn through.
Step 2: Front Needle: insert darning needle into the next stitch purl-wise, leave stitch on needle, pull yarn through.
Step 3: Back Needle: insert darning needle into the first stitch purl-wise, pull stitch off the needle, and pull yarn through.
Step 4: Back Needle: insert darning needle into the next stitch knit-wise, leave stitch on needle, pull yarn through.
Repeat steps 1-4 all around the cowl until you are back at the beginning. With your darning needle, close the join over the last four stitches by continuing to graft. Weave in your two ends. Block, rotating the cowl to prevent creases.
Spit Splice Join:
The wonders of 100% wool! The spit splice join will work beautifully on Shepherd’s Wool Crazy – and you will only have two ends to weave in at the end of your project!
To join a new ball of yarn with Crazy, simply cut off three inches of one ply from your old skein. Cut off three inches off one ply from your new skein. Wet the remaining single plies with spit or water, overlap the two ends so that the end of the new skein lines up with the cut off ply of the old skein, and rub vigorously in your hands for a minute. Gently tug the new and old yarn ends to check to see if the join has fused. If not, add a little more liquid and repeat until the two plies have fused.